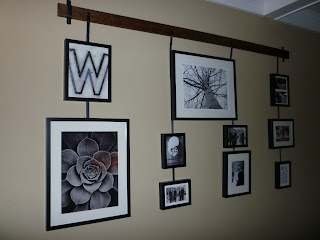
Studio Wall Easel
Tuesday, March 30, 2010

How to make your own Studio Wall Easel:
 Supplies: Piece of Wood, Wood Stain, Black Ribbon, Nails, Plumbing Pipe Brackets, and Picture Frames
1. I took a hammer to the piece of wood (mine is about 6 feet long). I distressed it by hitting it with both sides of the hammer multiple times.
2. I then took the plumbing brackets and bent them around the wood and into the shape I wanted.

3. I stained the wood until I had the color I wanted.
4. While the stain was drying, I took the plumbing brackets and sprayed them black (I also took a few screws and sprayed them black).
5. Once the stain was dry, I took 4 pieces of black satin ribbon (about 4 feet each) and nailed them into the board (leaving space for the brackets to be attached on the ends).
6. Then I hung the board on the wall with the plumbing brackets.
7. Here is the secret... I didn't really hang the frames from the ribbon. I used nails to nail through the ribbon and hold the frames in place on the wall. I couldn't figure out a way for the ribbon to hold the frames but after thinking about it for way too long... I realized I didn't need the ribbon to hold up the frames... it just needed to look like it was ;)
Labels: Decorating, House


0 comments:
Post a Comment