Slipcovers and #10 Cans
Monday, September 24, 2012
 I don't know about you, but I have a ton of #10 cans. You know, the biggest ones there are. Usually it's what the canned peaches come in at Costco. I also have alot of my food storage in them. We have been rotating our reserves and I ended up with a lot of empty cans. I can't re-seal them and I just couldn't bring myself to just stick them in the recycle bin. So I came up with some easy slip covers for the cans to easily organize toys and other miscellaneous things. Now that I have the design down, I plan to make a bunch more, and with all the different fabrics, really the possibilities are endless.
 Here's the how to:
You will need 2 pieces of fabric that are 20 inches by 7 1/2 inches.
and a circle that is 6 1/2 inches in diameter.
I added little windows for my labels, but that is totally optional but I'll show you how I did it.
First I cut a piece that was the size I wanted. Probably about 4x6 inches, then cut a piece of paper to help me create the window. Mark the corners of the paper about 1/4 inch away with a pencil like shown.
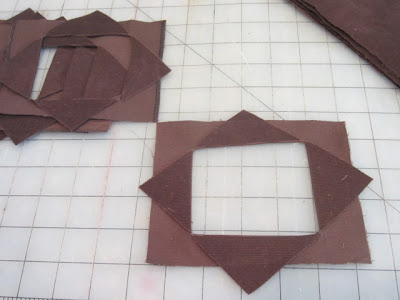
Match up the opposite pencil marks by folding the fabric.
Cut straight to the pencil mark as shown.
Repeat for the other side to create an X.
Lay flat with the wrong side up.
Trim the excess off from the flaps.
Stitch the window and the top edge which will be the opening.
Pin the window on the 20x7 1/2 inch piece of fabric. Turn the edges under and stitch in place.
Sew the short ends ( 7 1/2 inch sides ) together to form a tube. Do this with both pieces of rectangular fabric.
Hem the bottom edge of these tubes.
Now for the bottom.
Fold the circle in half and finger press to mark the lines. Put pins in to help mark the creases.
Do the same with the tube without the window. Pin in place matching the circle pins.
Stitch the circle into the tube. It should fit without much trouble or easing the fabric together.
Pin right sides together of both rectangle tubes and stitch together.
Turn and slip over your can.
Decorate as desired.
I made some white ones for my girl to keep her hair bows, jewelery, and other pretty things in on her dresser.
The boys got some Brown Courdoroy ones for their toys. I made the cards in Photoshop using CK Kiddo font.
I printed them on cardstock and will laminate them.
The cans fit perfectly under my little boy's bed and will definitely make clean up much easier.
Here's to thrify up-cycling to organize my kiddo's life!
Labels: #10 cans, organization, upcycle


0 comments:
Post a Comment