Showing posts with label summer projects. Show all posts


Hey TT&J readers!!! I'm Cheryl,
aka TidyMom! When I am not baking, crafting or running around with my camera
you can find me over in my little corner of the universe at
TidyMom.net


Like all of you I'm a HUGE fan of
Jen's and SO impressed with how much that girl can do!! I've had the pleasure
of meeting Jen a few times, and let me tell you, she's every bit as sweet, if
not more, in person as she is on her blog.


I share a lot of stuff on my blog,
everything from my favorite
recipes to my favorite household tips.
I like to share
photography tips and blogging tips, crafting , being thrifty
and
makeovers and a little bit of everything in between. I host a weekly
link up party on Fridays where you can share your great ideas, project or
anything you are loving, called
I'm Lovin' It.


I thought since Jen was having a
summer soiree, and I loooove to bring food to a party.......what's a summer
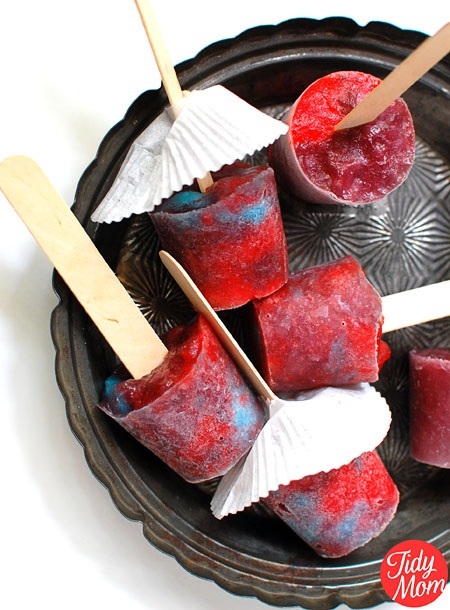
time party with out popsicles?!


These berrylicous popsicles are so
easy, even the kids can join in on the fun!


What you will need:


Berry
Blue Popsicles


Ingredients


  • 6 tablespoons berry blue gelatin


  • 1 cup sugar, divided


  • 2 cups boiling water, divided


  • 2 cups cold water, divided


  • 6 tablespoons strawberry gelatin


  • 18 Popsicle molds or paper cups (3 ounces each) and
    Popsicle sticks


Directions


  1. In a small bowl, dissolve berry blue gelatin powder and
    1/2 cup sugar in 1 cup boiling water. Stir in 1 cup cold water.

  2. In another bowl, dissolve strawberry gelatin powder and
    remaining (1/2 cup) sugar in remaining (1 cup)boiling water. Stir in
    remaining (1 cup) cold water.

  3. In a small bowl, combine half of the berry blue gelatin
    mixture and half of the strawberry gelatin mixture. (so you now have 3
    bowls of gelatin)

  4. Place all 3 bowls in freezer for about 2 hours or until
    slushy.

  5. In a large bowl, lightly swirl the three colors as
    desired.

  6. Fill each mold or cup with 1/4 cup gelatin mixture; top
    with holders or insert sticks into cups. Freeze.


Yields: about 10-18 pops depending
on the size.


Enjoy!!


Big thanks to Jen and all of you for
letting me stop by today!! Enjoy what's left of your summer! We started school
this week already!


Cheryl - those look delicious!!

Thank you for sharing them with us! I'm going to make those tomorrow with my kids - they'll think I'm supermom :)


Not only are Cheryl's recipes beautiful, but they are family-friendly and yummy! Like this Italian Grilled Pizza!


Or this Pina Colada Sorbet - delicious!


And not only can Cheryl cook, but she also makes some fabulous DIY projects!! Like this T-Shirt Scarf - one of my favorites!!


And this DIY Burlap Covered Bulletin Board - fabulous!!


I love following along with Cheryl at TidyMom to get great recipes ideas and so will you!!


xoxoxo


PS -- will you be attending SNAP? It's a fabulous conference in Salt Lake April 19-21,2012. I am thrilled to be helping with the conference and we would love to have YOU attend!! Plus, if you would like to speak at the conference, we are accepting applications for speakers.



Continue..

Filed Under: , , , ,


I don't post a lot of recipes here at Tatertots and Jello. So if I do post one, you know that it is delicious!! This is my favorite Summer Salad Recipe EVER! 


It's perfect for this time of year. Be sure to use fresh cilantro and tomatoes. I use frozen corn, just because it's easy, but fresh corn is even better!! 


This is a dish that people will talk about and want the recipe for.  


And best of all, it's simple, fast and easy to make!!!


Fresh Summer Corn Salad: 


  • 8 ears sweet corn OR 4 cups of frozen corn.

  • 1 large red pepper, chopped

  • 1 red onion, minced

  • 3 large tomatoes, chopped, or 25 mini tomatoes, cut in half


  • 1/3 cup cilantro, chopped


  • 1/3 cup lime juice


  • 1/3cup olive oil


  • Salt and pepper to taste


1. Cut the fresh corn off the cob or add the frozen corn to the pot and steam for 3 to 5 minutes in
1/4 cup water.

2. Remove lid and cook, stirring, 2 minutes more or until
water evaporates.

3. Toss the corn with all other ingredients and chill.


**Be sure not to overcook the corn.


Makes about 6 cups.


Seriously, I could eat this every single day and not get tired of it.


And, it's even better the next day :)


Have a Wonderful Day!!


xoxo


PS -- Are you thinking about going to The Creative Connection?? It's an amazing creative conference with dozens of handmade classes. Well, right now TCC is giving away TWO conference passes AND hotel -- so you AND a girlfriend can go!! 


So fun!


Continue..

Filed Under: , , ,


Hello, everyone! 


My name is Amy, and my blogging home is Positively Splendid, a little creative haven where you'll find everything from simple craft ideas to sewing projects, and just about everything in between. I would love for you to stop in for a visit!


I am so excited to be taking part in Jen's Summer Social! Today I'm going to share a quick project with you to punch up your table decor during your next outdoor gathering.


These fun  pinwheel placemats are a terrific project to complete with fabric scraps you might have lying around!


All set to see how these are made? Let's get started!

For this project, you will need...

Fusible web, such as Wonder Under
Iron
Fabric scraps in various prints
Paper and paper trimmer
Disappearing ink marker
Clear ruler
Scissors
Hot glue gun and glue sticks
Buttons
Ribbon and/or rick-rack
Bamboo placemats (I found mine in the Dollar Spot at Target)

step 1 / Use your paper trimmer to make square templates of various sizes. I found that squares of 4", 3" and 2.5" work well. Fuse contrasting pieces of your scrap fabric together, wrong sides facing, following the instructions for your fusible web. Use your disappearing ink marker to trace your square templates onto your fused fabric pieces, and cut your squares out. (You will need three squares of descending sizes for each placemat.) Using your ruler, draw lines diagonally through the center of your squares with your disappearing ink marker, as shown.


step 2 / Use your scissors to snip about 2/3 of length of the lines you just drew, as shown.


step 3 / Add a dab of hot glue to the center of each of your trimmed pieces. Fold every alternating corner of your snipped sections up to this center point, as shown, pressing them firmly into the hot glue to secure them.


step 4 / Add a button or other embellishment to the center of each pinwheel to conceal the glued corners. Cut strips of ribbon or rick-rack that are the width of your placemats and adhere these to the left side of your mat with hot glue. Hot glue three pinwheels of descending size, from largest to smallest, along this ribbon, as shown.


All finished!


Aren't these little guys so festive and fun? 


Thanks, Jen, for having me over today! I hope y'all will stop by Positively Splendid sometime soon. You can also find me hanging out on Facebook, Twitter, and Pinterest!

Photobucket


Amy!! 


That is absolutely adorable!!!


I want to make some RIGHT NOW!! 


Amy is one of my favorite blogging friends. We met for the first time at Blissdom and then we were able to hang out again at Creative Estates in April. 


{Here we are, along with another of my favorite people, Lara from Less Cake {More Frosting}.


There are so many reasons that I love reading Positively Splendid. One of the main reasons is Amy's love of color!!


I love her Boy/Girl Room.


And her pillows are amazing. So so cute!


I could spotlight every single project that Amy has made on Positively Splendid, because I love them all so much and you will too!! 


Be sure to head over and give her a big TT&J hello!!


xoxo


PS -- We finished shooting Day 1 of the Get a Little Creative Show yesterday. Check out the fun set. Chevron!


{thanks Shelley @ House of Smiths for the great pic}


Continue..

Filed Under: , , , ,


Hi everyone! 


I'm Stephanie from Somewhat Simple and I am here today to show you a simple idea that will spread some smiles to the recipients!
Give them to neighbors, friends, the girls you visit teach etc.


somewhat simple button


Otter Pop Gift Idea with Printable


Items Needed: 


  • OtterPops 

  • Pen or Marker 

  • Ribbon
    Embellishments (buttons, rhinestones, silk flowers etc.) 

  • Hole Punch
    Lighter or Match 

  • Glue Stick 

  • Hot Glue Gun 

  • Card Stock 

  • ..and this printable: 


Directions:


1. Print out the printable to your desired size and then cut them out. Also, cut out some card stock.

2.Glue the printable to the card stock.


3. Tie a small bundle of Otter Pops together with a ribbon. Burn the edges of the ribbon to avoid fraying.
4.Punch a small hole in the corner of each card and slide a small ribbon inside. Burn the edges of the ribbon to avoid fraying.


5. Tie the card onto the bundles of Otter Pops.

6. Hot Glue an embellishment to the center of the ribbons on each bundle.


7. Sign your name to the card.

8. Hand them out!


Simple and cute, just the way I like it!

Have a great day everyone!!!


What a fun Summertime idea Steph!! 


My girls are going to love that!!! 


If you don't know Somewhat Simple, you need to check out Steph's ideas!!


Mom I'm Bored Jar and Ideas!!


And check out her Summer of Service series -- I love this!!


Plus, she has a fun link party -- Strut Your Stuff on Thursdays!!


And look at the sweet addition Steph just added to her family. Mason is a little bit early, and isn't he the sweetest??


Congratulations Steph!!!! 


Head over to Somewhat Simple and give Steph a big TT&J hello!!! 


xoxo


PS -- Come over and join me in the International Coffee talk community. We're discussing all sorts of topics that relate to women. It's a great place to connect with people!!


Continue..

Filed Under: , , ,

AD

Related Posts Plugin for WordPress, Blogger...