
Nothing like putting things off until the last minute. I picked up these paint chips for.ev.ah ago because the colors reminded me of candy corn, and I got this *brilliant* idea that they would make a fun garland. I found them again a couple of days ago, and hurried to make this cute little garland to share with you all. I figure it's better late than never. And if you like it, you can always
Showing posts with label halloween. Show all posts
Showing posts with label halloween. Show all posts
I ADORE candelabras. This next project is perfect for those who may prefer not to use real candles. instead, make your own using a hot glue gun, a big bag of glue sticks, PVC pipe couplings & Flame-less flickering tea votive. This tutorial on how to make a faux dripping candle appearance is in a coveted copy of the book "How to Haunt your house" by Shawn & Lynn Mitchell. They have 3 in the series of their Haunting books. They are available on their website :http://www.howtohauntyourhouse.com/
as well as a few online book store sources. This project is in their first book of the series. They kindly shared on the DIY network exactly how to reproduce the look, suiting it to what ever decor use you may have in mind. The tutorial is available here
:http://www.diynetwork.com/how-to/halloween-decoration-how-to-make-a-faux-dripping-candelabra/index.html
So overjoyed with how easy it was as well as the outcome which produced many "you made that? no way! Teach me how.".

For the Halloween party, I creepified the candelabra by adding a black crow and spider webbing. The perfect centerpiece for the creepy foods table.

I could not get the thought out of my head on how to make realistic creepy night animal eyes which would appear as though they are watching you from a far. Finally the light bulb hit and this is what I whipped up. in daylight, they come out looking a bit like one eyed ninjas but set in pairs dispersed through the haunting woods trail... creep factor and distract from the next jolt of hauntingly fright moment.
At the Dollar tree {everything is $1 or below} I found a 12 pack of small pingpong ball style eyeballs. You could always make your own eyes using pingpong's but these were available & quick.
They also had 3 packs of the flamelss battery operated flickering tea candles. I bought over 10 packages of these to use for Halloween. From the carved pumpkins, candelabras and the eyeballs. Still far less in cost then already made projects.

Using an exacto knife or drill, you make a hole in the underside. Depending where you plan to put your one eyed ninjas, determine where you want the hole which will be where you insert the plastic flame tip of the candle. You need to test the size of the hole simply by inserting the flame tip into the hole. Too small? I used a steak knife tip to scrape the hole, shaving small bits off to enlarge it until perfect.

On the tea light, you put hot glue circling the plastic flame tip. Not too much or it will ooze from the eyeball placement. Just a few spots close to plastic flame tip.
When you are putting the eyeball on, apply it in a small twist fashion as it comes in contact with the hot glue. This will spread the glue in a uniform way that will help prevent oozing as well.

Cut rectangle shapes, using your dried eyeball candles as a source of amount, with 1 inch wider then the sides, using black tight knit fabric.Find placement of the eye pupil, mark with white chalk for accuracy. Cut an almond shape from this spot fitting to the proper size of your eye to show.
Using hot glue gun, wrap your eyeball light up, making sure the hole is in proper place. You MUST be sure to have every bit covered right down to the base so light does not shine from underneath. Ruining the illusion.

The eye on the left needs more fabric on the base bottom. Off in the distance, in bushes, amongst the fallen leaves around 20 or more feet away from where people will be walking, place your eyeballs in pairs.

These worked out great for our trail haunting. I place them by tree stumps with leaves scattered around to add to the mirage. The kids LOVED it! These flickered to give the appearance of eyes twitching and blinking off in the distance. Making the kids do a double take, giving a distraction as they walked the trail before... BAM! scary guy moment. Screams and jumps. Thrills and laughter. It's all about messing with their perceptions. Distractions that are not "obvious" help knock their guard off. More or less. Mess with their heads. And they could not get enough. Going back on the trail a few more times.
Now I'm off to see if I can get my hands on book 2 & 3 of " How to haunt your House " for more projects to work on over the next 360 days... I've got a Teen Halloween Haunting to plan in our own house next year. As well as the creep factor to play on with the woods and old graveyard next door.
Halloween. My favorite Holiday just got better.
Sweet dreams,
~Tammie
Halloween is my favorite holiday and this year is even more special. I finally get to expand my Halloween fun by haunting a trail in the woods behind one of Panda's friends home. I volunteered to help the parent with decking out the trail as well as some of the little party details such as the food table. Doing these parties for our children can get a bit overwhelming on our own. Having some help makes itless stressful. Not too mention, a combining of skills most appreciated.
I rarely use a glue gun for projects. That is until I began to realize it has far more uses then gluing things down.
I have a few Halloween projects to share with you. This one is all my creation. The others are inspired from other resources.
In Frog's garden I discovered some fantastic dead flowers for placing an arrangement on the table. Not just any vase will do. I needed a piece to carry on with the theme.

I grabbed a large glass and began to make crackle spider web effects up and down it's exterior.Keeping the gun tip close to the glass as I trail shaky various size glue strips. Then I utilized the hot tip to squiggle them out which gave a great spidering effect. With a different seasonal theme, this could be done to appear as frost too.

Once I felt satisfied with the amount, I grabbed leaves from the yard and stuffed a few in the bottom. The next step was layering them along the walls of the glass so it appears filled to the brim with dead & colorful Fall leaves.

The next step was arranging dead flowers and stems found in the garden. From Teddy bear sunflowers, basil seed pod strands, dried up zinnias as well as a cosmo appearing flower bunch. I did not want to stuff it full of stems being there must be room inside to retrieve & replace the flameless flickering candle which sets off an eery candle fire effect nestled down inside the glass a few inches from the top.

To hide the battery operated votive candle, simply place a few small leaves strategically around it's base or just paint the base a neutral color like black or brown to blend it in.
There simply is not a way I have found to share with you the amazing effect seen in person with the candle light on. The votive is great for those dark nights and not so bright rooms. It truly makes it appear as the flowers are on fire inside, casting the shadows of dead stems and heads onto the walls.
This took all but 10 minutes to whip up. Imagine the table decked out with platters of coffin sugar cookies, colored chocolate realistic looking eyeball cookies, deer meat sloppy Joes as well as a few other Haunting foods on a blood deep red tablecloth. Black crows, a realistic dripping wax candelabra complete with flickering flame less candles & bits of glue gun spider webs.{ Of course, don't forget the dead flower arrangement. No proper table is complete without a flower arrangement.
Up next : Have you heard of slender man? Apparently just mentioning this names evokes fear in the minds of the heathens. I'll also share how to make your very own Hauntingly awesome Candelabra. Perfect for everyday use, especially grand for ghoulish mood setting.
Stay tuned for some Haunted trail DIY & more Halloween treats to whip up.
Sweetest dreams,
~Tammie
Last year, the kiddos and I ran across this Halloween project from Family Fun Magazine that they reeeaaalllly wanted to make: Mr. Bottle Bones.
Thing is, it takes 8 gallon-size plastic milk bottles to make, and it was too close to Halloween to save up that many. So this year, I started saving milk bottles in September, and we finally had enough a few days ago.
So I printed up the
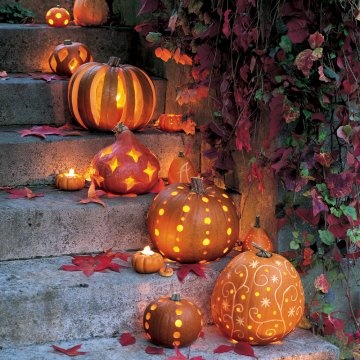
It's common to decorate for autumn and Halloween with pumpkins and Jack O' Lanterns,
but how about doing something a little bit different this year?
Take a look at these unique and creative pumpkin decorations and maybe you'll be
Take a look at these unique and creative pumpkin decorations and maybe you'll be
inspired to try something new too!


Create a beautiful pumpkin planter. By Circa Dee

I love the unique look of this black painted Jack O' Lantern.
I love the unique look of this black painted Jack O' Lantern.


A very pretty carved pumpkin

Black cat painted pumpkins from Sunset

Owls from Marie Claire Fr

Here's a unique idea for a white pumpkin from A Vintage Holiday

How about a talking Jack O' Lantern?
Black cat painted pumpkins from Sunset
Owls from Marie Claire Fr
Here's a unique idea for a white pumpkin from A Vintage Holiday
How about a talking Jack O' Lantern?
Hide an old baby monitor inside to spook friends! from Martha Stewart
What do you think?
What do you think?
Filed Under: autumn, decorating, fall, fall crafts, halloween, Halloween crafts, holidays, home decor
I love when I see a Halloween costume that's both clever and unusual,
or one that makes me laugh...
Have a look at these unique & creative Halloween costumes and maybe
you'll be inspired to dress up too!


I had to include this one, just because.
Pin this post!

What do you think?
What are dressing up as for Halloween this year?
Pin this post!

What do you think?
What are dressing up as for Halloween this year?
Filed Under: costume ideas, costumes, creative costumes, halloween, Halloween costumes, homemade costumes
Looking for some spooky Halloween foods & party snacks that will
impress and creep out your friends at the same time?
Check out these cool & creepy Halloween food ideas and
be inspired!


Band-Aid snacks by Katherine Marie Photography


Witch hat cookies by Barbscharm
Upside down Keebler fudge stripe cookies, icing, and Hershey Kisses


This version of witch's fingers uses pretzel rods dipped in green colored chocolate.
A slivered almond fingernail and scraped in knuckles completes the look.
A slivered almond fingernail and scraped in knuckles completes the look.


For someone with the time and patience to create intricate snacks


What do you think?
Pin this post!

Pin this post!

Filed Under: food, halloween, halloween party, holidays, party, recipes, snacks


