

We were challenged this month at the random acts of craftiness at His & Hers blog to use an item from a grocery store, which has a link up party in January for sharing these projects. I wanted to have quick and easy craft because this month has been quite busy. I also wanted to make something along with my toddler. I picked up this container at Target and then purchased some jello.


Megan
Monday
Alderberry HillThe Gunny Sack
The Dedicated House
Adventures of a DIY Mom
Home Stories A to Z
Todays Creative
Tuesday
Uncommon Designs
A Diamond in the Stuff
Elizabeth & Co
Romance on a Dime
The NY Melrose Family
The DIY Dreamer
Claiming Our Space
The Winthrop Chronicles
Full Circle Creations
Wednesday
Southern Lovely
We Like To Learn As We Go
The Shabby Creek Cottage
Someday Crafts
High Heels & Grills
Thursday
The Taylor House
At The Picket Fence
Live Laugh Rowe
A Glimpse Inside
Seven Alive
52 Mantles
Fireflies and Jellybeans
Bloom Designs
House of Hepworths
Momnivores Dilemma
Western Warmth
Saving 4 Six
Friday
One Project Closer
504 Main
Redoux Interiors
Craftionary
The Grant Life
Just Us Four
Thrifty Handmade Days
Tatertots & Jello
Fresh Eggs Daily
Saturday
Too Much Time On My Hands
Tutus and Tea Parties
Classy Clutter
Its Overflowing
Sunday
Nifty Thrifty Things
Flamingo Toes
Twigg Studios
C.R.A.F.T.
My 1929 Charmer
Brassy Apple
On the 12th day of Christmas Beyond the Picket Fence gave me, some lights and snowflakes for all to see. I do not know how to photograph lights at night, and I know the manner I used is not the correct technique, so forgive the pictures, but actually, they do a good job of capturing what this looks like in real life at night. Also, you don't get to see a full window shot, i.e. a full shot of the dirty dishes in my sink. I have been running from one event to another today and just got home from a football banquet that I had to cook for, hence the dirty dishes.

 I wrapped and draped lights down both sides--icicle lights would be great too, but all of mine are on the outside of the house. So I just used mini white lights--three 100 count strings.
12 Days of Christmas Linky Party Rules
1. Please link up only Christmas or other winter holiday (i.e. Hanukkah, Kwanzaa) ideas.2. Please include my 12 Days of Christmas button on your blog or a link back to my blog.
3. Please visit each other's posts and comment.
4. No direct links to items you are selling.
Thank you--have fun!
**STOP--Before you link up PLEASE read rules, this is a holiday linky party, thanks!
Filed Under:
I have been missing-in-action for the last little while, I know.
Thanks for you patience with me! Hopefully things will be back to usual here at The Shabby Nest soon.
But I wanted to pop in today to announce the winner of The Vintage Pearl $50 Gift Card!
And the winner is STEPHANIE of The Huntley Home!
Congratulations Stephanie! Please drop me an email and we'll set you up with your
Filed Under: giveaway winners, Sponsor

My cute Sis-in-law found a fun Santa Project on pinterest. The original was done on a board painted white. You can see the post here. I decided I wanted to do mine on Canvas and Burlap. There are two Santa's shown here and I've given you my favorite images I found on Google Images. Coloring pages work the best. I followed the same method as shown here.

Except I attached my fabric to my quilting stands to get it pulled taut. Again I just used a sharpie to outline the image. For the Wall hangings I added red fabric to the edges to frame Santa. I also added a small sleeve at the top to be able to slide a dowel through for hanging. I wanted a happy Santa and these were my favorite images.


He sure looks handsome there on my wall. A quick easy project, and
Oh, So, Festive!
Filed Under: Christmas
The holiday season is quickly approaching and many of us are busy decorating our
homes for Christmas. This year, why not create your own unique holiday wreath
from things that you already have around your home?
To get started, all you need is a wreath base (inexpensive wreath bases can be
purchased at most dollar stores), a glue gun, and a little creative thinking.
Check out these extraordinary upcycled wreaths created from ordinary household
objects and maybe you'll be inspired to try your hand at creating one for yourself!
objects and maybe you'll be inspired to try your hand at creating one for yourself!

Paint brush wreath by Anthropologie


Wood spool snowflake wreaths (above and below) from twopeasinabucket


Tea wreath made with clothespins by Kojo Designs
 Recycled traffic sign wreath by Boris Bally via Eco-artware
 Vintage brooch Christmas wreath by Fiorella Jewelry via Etsy
 Sheet music wreath (above and below) tutorial by Mitzi's Collectibles

 Create a wreath from old Christmas tree ornaments like this one by Eddie Ross
(above and below) Simply glue the caps onto each ball and then string them onto a wire hanger

(Like this look? Check out my previous blog post on Vintage Christmas Ornament Wreaths)
 Pin this post!
What do you think?


(above and below) Simply glue the caps onto each ball and then string them onto a wire hanger
(Like this look? Check out my previous blog post on Vintage Christmas Ornament Wreaths)

What do you think?
Filed Under: Christmas, crafts, decor, diy holiday crafts, holiday, holiday decorating, home decor, recycled, upcycled, upcycled Christmas, upcycled wreath, wreath, wreaths
The chill is back over here, and it's colder than ever. I am not a cold weather gal, but these fireplaces make me wanna say "Hooray, it's cold outside!"


Filed Under: designing tips, inspiration, mix, moodbaord, remodeling
Good Morning All,
Ever run into a piece of wood (pallet wood in this case) and wonder; "How the heck did that warp like that?" Working with pallet wood can be a twisted mess of metal, warp and work. These things lead to a lot of distress trying to make them work for a project, leading you to want to pull your hair straight out.
Read more »
Filed Under: building with pallets, pallet, pallet bath tray, pallet craft, pallet projects, pallet table, pallet wood recycling, pallet woodworking, pallets, project, wooden pallet, woodworking with pallets

SORRY FOR THE LATE START ON THE
FEATURES TODAY! BEEN SO BUSY WITH
THANKSGIVING, BLACK FRIDAY AND CYBER MONDAY!! GETTING TIRED
JUST THINKING ABOUT IT AGAIN...
ANYWAYS HERE ARE THE FEATURES
FOR TODAY!
FEATURES TODAY! BEEN SO BUSY WITH
THANKSGIVING, BLACK FRIDAY AND CYBER MONDAY!! GETTING TIRED
JUST THINKING ABOUT IT AGAIN...
ANYWAYS HERE ARE THE FEATURES
FOR TODAY!
ANTIQUE DESK
THIS FIRST FEATURE IS FROM
SHANNA @

SHE DID A GREAT JOB
RESTORING THIS OLD DESK
BEFORE...

AND AFTER...

I LOVE THE COLOR AND THE
STAINED TOP!

SUCH A GREAT PIECE!
SHERWIN WILLIAMS
PARADISE
THATS THE COLOR OF THIS
OTHER BEAUTIFUL PIECE SHE DID.
HERE IS THE BEFORE...

AND AFTER..
I LOVE THIS COLOR....


ANOTHER BEAUTIFUL PROJECT!
#2
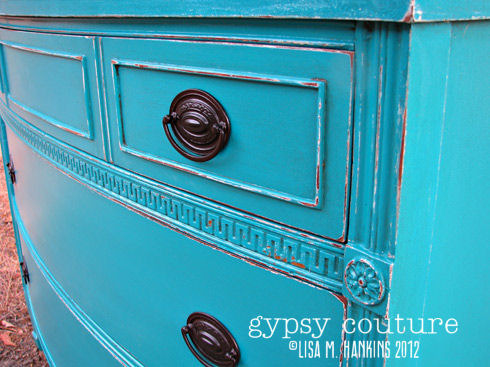
THE TURQUOISE DRESSER
THIS FEATURE IS FROM
LisaMarie @

#2
THE TURQUOISE DRESSER
THIS FEATURE IS FROM
LisaMarie @
THIS IS HER PIECE IN
THE BEGINNING...

THE BEGINNING...
AND AFTER...

QUITE THE BEAUTY!
LOVE THE COLOR!
ANOTHER GORGEOUS PIECE OF
HER'S THAT CAUGHT MY
EYE WAS THIS
GREY CHEST REDO
HER BEFORE...

AND AFTER...


BE SURE TO PAY HER A VISIT AND
CHECK OUT THE REST OF HER
PORTFOLIO!
#3
TUXEDO DRESSER
THIS BEAUY IS FROM
SAMAA @

HERE IS THE PROJECT
IN THE BEGINNING...

NOT MUCH TO LOOK AT
BUT IT HAS GREAT BONES!
AND AFTER...


I LOVE SEEING THE PIECE
AS IT WAS TRULY MENT
TO LOOK! GORGEOUS!
LITTLE BEAUTY
THIS PIECE REMINDS ME A LITTLE
OF THIS OTHER PIECE SHE DID.
BEFORE...

AND AFTER...
 YOU CAN CHECK OUT THE REST OF THE
PICTURES ON HER BLOG!
QUITE THE BEAUTY!
LOVE THE COLOR!
ANOTHER GORGEOUS PIECE OF
HER'S THAT CAUGHT MY
EYE WAS THIS
GREY CHEST REDO
HER BEFORE...
AND AFTER...
BE SURE TO PAY HER A VISIT AND
CHECK OUT THE REST OF HER
PORTFOLIO!
#3
TUXEDO DRESSER
THIS BEAUY IS FROM
SAMAA @

HERE IS THE PROJECT
IN THE BEGINNING...

NOT MUCH TO LOOK AT
BUT IT HAS GREAT BONES!
AND AFTER...


I LOVE SEEING THE PIECE
AS IT WAS TRULY MENT
TO LOOK! GORGEOUS!
LITTLE BEAUTY
THIS PIECE REMINDS ME A LITTLE
OF THIS OTHER PIECE SHE DID.
BEFORE...
AND AFTER...
PICTURES ON HER BLOG!
THANKS FOR STOPPING OVER!
PLEASE GRAB
A FEATURED BUTTON!

HOPE TO SEE YOU ALL BACK NEXT WEEK!
Filed Under: REVIVAL MONDAY FEATURED BEFORE AND AFTERS


