Showing posts with label projects. Show all posts

I was in a Valentine-y mood this weekend, so I decided to create a great BIG Valentine sign for my family.  What does one use to create a great BIG Valentine sign?   Well, in my case I decided to repurpose a pallet.


The pallet used to be art in the boys' bedroom with a cardboard deer head hanging on it.  But when I updated the antlers I received from my mom, they ended up in the boys' room.

Continue..

Filed Under: , ,


In yesterday's kitchen update reveal, you may have noticed the E-A-T letters above our cabinets.  (Or you may not have - they are kind of small in the photo.)  Today, I wanted to share with you how I created our "EAT" sign.  You've probably seen similar letters all over blogland.  They couldn't be easier to create, and they make a perfect focal point for any empty wall space in your kitchen.


Continue..

Filed Under: , , ,


Once upon a time there was a mommy/blogger/interior designer/daughter/sister/friend who had a lot of stuff going on all at the same time - I'm pretty sure you all understand exactly what I'm talking about.  Am I right?

Since she had so much going on, all of her creative projects were in various states of  not-quite-finished-ness (yes, that is a word).

So instead of blogging a fabulous project..

Continue..

Filed Under: ,


Last Thursday, I had the opportunity to appear on Studio 5  where I talked about actually making some of those projects I've been pinning on Pinterest .  


My completed Pinterest-inspired project


As you can tell from this photo, I have had these black saddle-style bar stools for quite a while.

More after the jump...


You may remember that I added vinyl numbers to them when we lived

Continue..

Filed Under: , , ,


Today I'm sharing another treasure I received from my parents - a set of vintage deer antlers!


I was so excited to get these from them, but I wasn't jazzed with the way they were mounted. The highly varnished wood plaque and the red velvet just wasn't cutting it for me. So I decided to give the whole thing a bit of a facelift.

I started by sanding and painting over the plaque with a coat

Continue..

Filed Under: , ,


Not your average box of cookies found here. They average from a few hours to a dedicated day of creating.  

Gift #1
 For the Outdoorsy recipient, Make them a Dog Back Pack! Dogs can carry up to 25% of their weight in a pack. Things like their ball/Frisbee. Water, treats and food as well as collapsible containers. Moose is big enough to even carry my water and mini first aid kit with his own supplies. Pricing all the pieces needed if buying all new as well as velcro instead of zippers, I came to a total of $15. If you happen to have a few like new hunting vests or can ask around for a few, this would make the project cost half as much as well as visual enhancing!
http://www.craftster.org/forum/index.php?topic=309913.0
Moose will be receiving one in neon orange being he's a large animal whose color easily makes him mistaken for a deer to a less responsible & eager Hunter.  Neon orange would also be great for those joggers and walkers. 
Gift #2 & 3
Do you knit?  I don't... sadly I just do not have the patience. But if you do, why not knit up a trendy Scull cap! I've shared with you *over Here* how to make one from a sweater and ball cap visor for us non knitters. This was in 2010 and it still looks great after multiple wash & dries! 

Over at Amanda Knits, she graciously shares her knitting pattern for this "code 88" scull cap! perfect for a wide variety of recipients and in one comment, it was said to take just 5 hours to knit. Perfect for that Ice Fisherman, Hunter, Teen and father! Heck, even the women of the house could enjoy one of these for a jaunt to the chicken house, a walk on the trails or for the lazy winter hair days doing outside chores..
http://amandaknits.com/download/code88hata.pdf
Gift #4
On the subject of outdoor wear, here's something for the younger Boys and girls! Another Upcycle sweater DIY gift:

Gift #5
It's One for the birds! The more grown up version of the birdseed pine cone feeder. Detailed tutorial shared by Stephanie Lynn. Complete with inspiration for various shapes other then a "do nut" wreath. Time to eye those never used jello molds and decorative tins. Remember~ Package & presentation! That ribbon makes this go from ordinary "Oh thanks" to "This is so cute!".Homemade with pro results. Your local fabric stores should have some major sales going on right now so go browse for the perfect cloth to make your "ribbon hang ties". Nothing cutesy like child style graphics. Take inspiration from this cute flannel plaid print.
http://www.bystephanielynn.com/2010/11/how-to-make-homemade-birdseed-wreath.html
Gift #6
This next one can be customized between adult or child use. Use multi fabrics or coordinate colors to their interests. Perfect for lounging outdoors under a tree reading or watching the kids play. Easy enough to throw in the trunk for use at a park, camping, out on the lake, sleep overs and so on down the list. Double use being perfect for indoor lounging. This is a bit more time dedication but makes a great way to use up the leftover fabric pile or those too small pairs of jeans you have yet to rid yourself of. Use your imagination for fabric upcycle! If giving to a child, this would be nice combined with a book either in a series they enjoy already or introduce them to a new one. 
The DIY Jelly Roll Floor pillow:
http://www.shelterness.com/amazing-diy-jelly-roll-floor-pillows/
If gifting a book{s}, why not wrap them up with a natural twist? Brown craft paper or brown bag for the wrapping. A sweet stamped gift tag with a sprig of cypress, pine or other winter greenery. The extra effort will not go unnoticed :


Gift #7
More simple sewing? Have problems cutting things straight? Then THIS may be a great way to give a sewn gift without doubt. Bandanna square blanket! There are so many colors and designs to use Go explore the accessory aisle for inspiration. Have a look online for even more styles. As created by Deco Allure, shared on her site complete with a mini how to:
Photo via Deco Allure
Gift #8
Have a garden lover? Maybe give a touch of Curb appeal to a smaller space outdoors? I've already began looking through my garage PVC pipe extras for one of these. Spray paint for the finish in a bright or mute color. This one below with complete tutorial, was made with Copper. If you can afford to splurge on copper for gift use, you are in for a major grateful recipient. Enlarge the pieces for a pathway walk through or make small for Rose bushes. Wonderful DIY and inspiration via Fine Gardening:

Gift #9

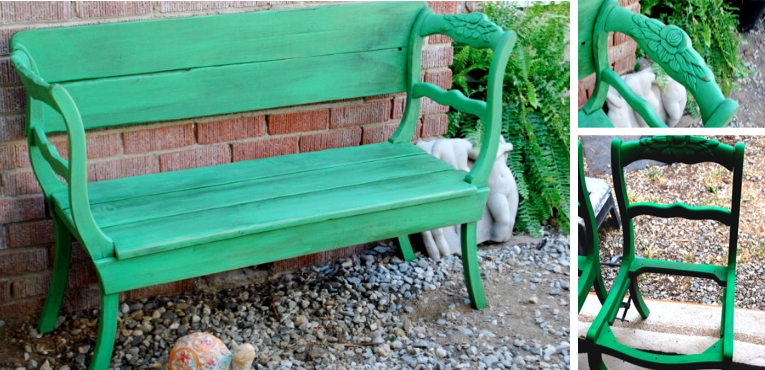
Another WOW factor DIY on a budget for something Extraordinary.. Make a bench from 2 dining chairs! Perfect for the porch to encourage no shoes or boots in the house. Put in a foyer, out by the garden, in the house or bedrooms. This one looks easy enough with a *tutorial by An Oregon Cottage*
This one with a back seems more to my taste & use. My favorite hence far, *MakandJill* but no tutorial.
 I did find a slew of various DIY dining chair bench tutorials through *Scrap Hacker.* A trip to the second hand stores or other resourceful spots for a few old dining chairs will range as little as free up to $15 per chair. Personally, I would never go higher then that and even then it better be drool factor worthy used dining chairs.
Part 4 of this series will end with one of my top favorite DIY gifts. Small enough to tag along on your hikes and car rides. Creative & Pretty enough to indulge your admiration for old book covers. Start searching for those local used Book sales such as the ones held by your local library. This one is a must on my DIY list.
Gift #10
http://cosmocricket.typepad.com/cosmo_cricket/2012/05/diy-activity-book-fabric-giveaway.html
I picture this one with many creative possibilities. Shown here as a sketch book kit, it  can easily be  transformed into a child's travel coloring kit. A "secret Journal" stash or car ride crossword puzzle purse.
This one one you DO judge a book by it's cover.
 Now I'm off for a little R&R before I belly up the sewing table.
Keep watching for Part 5 of the Gift DIY series. A little bit of everything with plenty more kick.
Sweet Winter Dreams,
~Tammie

Continue..

Filed Under: , , , , , ,


You all know how I LOVE making Homemade gifts for the holidays. A few years back I began my
* Straight from the Farm winter holiday gift baskets *. Each year our family makes something different to go into these. The items are created throughout the year with our Loved Ones in mind. Being we do not exchange gifts amongst the adults, we do this as a family gift. Sharing with others what we grow & make for ourselves. A few additions thrown in but ALWAYS home & handmade.
 In this series, I will share & hopefully inspire your Hand & Home made Holiday gift baskets beyond the average perishable cookie & bit theme.
 
These DIY inspiration's are non edible. Versatile enough for everyone.
First up is Concrete candle holders. None of that dixie cup crudeness.
How about a cool dozen of these square low boys to line a deck side, a drive or walk path. Even the porch railing would benefit from their soft glow. Inside, a flight of stairs would be stunning.
 Collect small to medium waxed cardboard cartons {like whipping cream,milk, half & half, etc} to create the shape.Even jewelry gift box or other small containers can be utilized. Lay container on side, cut hole on top candle side, using your tea light metal base as the pattern. Seal all excess openings with wax paper/duct tape. Scoop cement mixture,{using Fine concrete & not rocky} into the hole you cut. An old funnel would work well too. Once filled 99%, insert tea light with metal base into hole. Let sit 2-4 days until dry before removing the waxed cardboard container.
Package them with tea lights or flameless flicker votive. Wrap in 3's with a wide ribbon or even rustic twine with a note card suggesting o their use & your wishes for a bright season.
This next one can be achieved by cutting luan wood or THICK cardboard for each side & secure with a wrapping of duct tape. Don't forget to close up the bottom with same. Use Hard as Nails glue to attach the top candle holder portion to the Pedestal.
 
While your at it, why not whip up a * concrete vase * {<~click for DIY} similar to this, with or without the succulant to make as a set:
Photo Via Home Beautiful
 
Candles more up your alley? Then take a moment to explore this Pinterest collection of Candle love:
SO many inspiring snippets such as this personal Favorite {and soon to be in my home item}:
 or maybe a nice concrete bird bath bowl paired with the most useful creation I have
 ever seen with Acorns.
Floating Acorn Cap candles! It is become more rare to find candle making supplies in local stores so call around to craft & hobby stores before making the drive to assume it will be stocked. These are made from those Oak Tree fallings, just a dab of wax & the small thin NON Zinc core wick and smallest wick plate clamp. If you have access to Oaks, make it a family hunt to find those perfect caps. Don't forget a few nice quality snapshots to use as a tag for the gift. Showing you together. As a Family with the oak tree, leaves or handfuls of Acorns & grinning faces..
 
One last Candle cuteness. Burlap wrapped glass holders with a hand stamped message. I envision these with the Family Last name, and/or words such as Cherish, Dream, Strength, Hope, or other inspiring quality/encouragement you feel may be fitting.
 
No worries if none of the idea's appeal to you. I have a heck of a lot more for feasting your eyes and oiling those Creative gears. From kitchen to workshop. Share the TRUE meaning of the season and not the Market disease it has become.
Now off to refashion the baskets I found for all the great wonders of our Little Stone Cottage Holiday baskets.
 
Wishing you the Sweetest of dreams,
~Tammie


Continue..

Filed Under: , ,


I ADORE candelabras. This next project is perfect for those who may prefer not to use real candles. instead, make your own using a hot glue gun, a big bag of glue sticks, PVC pipe couplings & Flame-less flickering tea votive. This tutorial on how to make a faux dripping candle appearance is in a coveted copy of the book "How to Haunt your house" by Shawn & Lynn Mitchell. They have 3 in the series of their Haunting books. They are available on their website :http://www.howtohauntyourhouse.com/
as well as a few online book store sources. This project is in their first book of the series. They kindly shared on the DIY network exactly how to reproduce the look, suiting it to what ever decor use you may have in mind. The tutorial is available here
:http://www.diynetwork.com/how-to/halloween-decoration-how-to-make-a-faux-dripping-candelabra/index.html
So overjoyed with how easy it was as well as the outcome which produced many "you made that? no way! Teach me how.".
 
For the Halloween party, I creepified the candelabra by adding a black crow and spider webbing. The perfect centerpiece for the creepy foods table.
I could not get the thought out of my head on how to make realistic creepy night animal eyes which would appear as though they are watching you from a far. Finally the light bulb hit and this is what I whipped up. in daylight, they come out looking a bit like one eyed ninjas but set in pairs dispersed through the haunting woods trail... creep factor and distract from the next jolt of hauntingly fright moment. 
 At the Dollar tree {everything is $1 or below} I found a 12 pack of small pingpong ball style eyeballs. You could always make your own eyes using pingpong's but these were available & quick.
They also had 3 packs of the flamelss battery operated flickering tea candles. I bought over 10 packages of these to use for Halloween. From the carved pumpkins, candelabras and the eyeballs. Still far less in cost then already made projects.
 
 Using an exacto knife or drill, you make a hole in the underside. Depending where you plan to put your one eyed ninjas, determine where you want the hole which will be where you insert the plastic flame tip of the candle. You need to test the size of the hole simply by inserting the flame tip into the hole. Too small? I used a steak knife tip to scrape the hole, shaving small bits off to enlarge it until perfect.
 
On the tea light, you put hot glue circling the plastic flame tip. Not too much or it will ooze from the eyeball placement. Just a few spots close to plastic flame tip.
When you are putting the eyeball on, apply it in a small twist fashion as it comes in contact with the hot glue. This will spread the glue in a uniform way that will help prevent oozing as well.


 Cut rectangle shapes, using your dried eyeball candles as a source of amount, with 1 inch wider then the sides, using black tight knit fabric.Find placement of the eye pupil, mark with white chalk for accuracy. Cut an almond shape from this spot fitting to the proper size of your eye to show.
Using hot glue gun, wrap your eyeball light up, making sure the hole is in proper place. You MUST be sure to have every bit covered right down to the base so light does not shine from underneath. Ruining the illusion.
 
 The eye on the left needs more fabric on the base bottom. Off in the distance, in bushes, amongst the fallen leaves around 20 or more feet away from where people will be walking, place your eyeballs in pairs.
These worked out great for our trail haunting. I place them by tree stumps with leaves scattered around to add to the mirage. The kids LOVED it! These flickered to give the appearance of eyes twitching and blinking off in the distance. Making the kids do a double take, giving a distraction as they walked the trail before... BAM! scary guy moment. Screams and jumps. Thrills and laughter. It's all about messing with their perceptions. Distractions that are not "obvious" help knock their guard off. More or less. Mess with their heads. And they could not get enough. Going back on the trail a few more times.
 Now I'm off to see if I can get my hands on book 2 & 3 of " How to haunt your House " for more projects to work on over the next 360 days... I've got a Teen Halloween Haunting to plan in our own house next year. As well as the creep factor to play on with the woods and old graveyard next door.
Halloween. My favorite Holiday just got better.
Sweet dreams,
~Tammie

Continue..

Filed Under: , , ,


Last year, the kiddos and I ran across this Halloween project from Family Fun Magazine that they reeeaaalllly wanted to make:  Mr. Bottle Bones.


Thing is, it takes 8 gallon-size plastic milk bottles to make, and it was too close to Halloween to save up that many.  So this year, I started saving milk bottles in September, and we finally had enough a few days ago.


So I printed up the

Continue..

Filed Under: , , , ,


Hello Lovelies~

Today I wanted to share a Halloween chic (and super easy) garland that I created!


This week I was thrilled to receive my copy of the new Halloween with Matthew Mead book which was the inspiration for my little garland.  One of the stories in the book featured a myriad of ways to use the adorable "man in the moon" printable that I used for my garland.  And the printable is

Continue..

Filed Under: , , ,


 Been so busy with working at the Farm & playing with the old camper, I once again have neglected you.. Hopefully these progress shots make up for it a little...
I moved the camper from the sheltered backyard to the hill garage area- Now THAT was a 25 minute job with potential of a cartoon ending. But I got there. By myself... just not straight. Thankfully these small campers can be lifted in the front with some help & maneuvered  a bit.
This is the front side where I began using rubbing compound on the top before playing with the few coating of roofing elastomeric. If you remember from the first set of viewing, the oxidation was much harsher. That boat cleaner lightened it but did not get all the way through. Rubbing compound & a rotary buffer to the rescue! This is also the window I had to make my own glass holder framing. Hence that shiny aluminum trim on the big window.
 Remember the roof at last viewing? I FINALLY got to a point of sealing. That back rectangle vent? yeah. Thats gotta go. All this work to seal it up & I discover that vent with windy rain make for a very wet interior. Searching out a small bit of sheet metal before I finish up there.

 For removing the last bit of oxidation, I am using Rubbing compound with the buffer tool. Cuts through but it still takes some time & skill on a ladder...
 Ahh, the back side. I have yet to do much here. The trim is not even back on. I did put new rubber gasket on the small window and replace window screws, rain drips.
Lots of work still to be done before the chill of Fall takes over & my non insulated self takes refuge inside... with that electric fireplace that came with it of course!
Hopefully I get the sealing all done so I can get the wood walls up & have the top half of the skins polished for their waxing. The bottom half will be painted in the Spring.
Now I must bid you adieu being the Farm will not sleep in for lil ol' me. and of course I wish you...
Sweet dreams,
~Tammie

Continue..

Filed Under: , ,

0


Fine Cell Work is a social enterprise that teaches needlework to prison inmates and sells their products. The prisoners do the work when they are locked in their cells, and the earnings give them hope, skills and independence. 80% of the stitchers are men, all taught by volunteer instructors. The worthy's project mission is to rehabilitate prisoners by giving them the opportunity to earn and save money and the chance to reflect on and rebuild their lives through craft and achievement. Founded in 1997, Fine Cell Work products are available online or from their London showroom:  38 Buckingham Palace Rd, SW1W 0RE, London.

Continue..

Filed Under: , , , ,


Wake Up poster
Wake Up, wake up!!! The upcoming event at Green Bay Wakeboarding center is happening in just two weekends! Here's a taste of the event, I previously posted the work I did for Green Bay's rebranded new image. Here's more of the work I did for the center.  See the event on Facebook. More of the project to come soon.
Wake Up logo
Event t-shirts
Green Bay Wakeboarding Center wordmark
Green Bay t-shirt collection

Continue..

Filed Under: , , , , , ,


Sometimes the greatest adventure brings more then you anticipated. In this case, my canned ham has turned into a Can of worms...or in my case, Ants... But let's start from the beginning.
I traveled an hour to pick up my camper early. All by myself. How Independent of me, or so I intended.
That morning I grabbed some magnetic tail lights for it's towing as well as the hitch ball. You'd think I could just hitch what Panda has dubbed "The Baked Potato" to my truck & off we'd go. Nope. Let's just shorten this a bit to say the seller spent 5 HOURS trying to connect the wiring for the magnetic lights to The Captains truck being we discovered there was not a Plug set up for the job. 
{taken with a cell phone so it's great}
One thing lead to another and combined with being in 95 F degree sun on asphalt the entire time, I ended up calling The Captain to drive the hour out to follow me back home. Major NO NO but I could not leave the camper where it was due to being unsecured in a Reception Party hall parking lot.
 Instant flashes of drunk wedding reception guests getting the bright idea to 
1. Force their way inside to sleep off a night of celebration. {what a surprise that would have been for both parties if I came the next morn & just hooked her up & drove away... }
 2. decide how fun it would be to push her over the hill just off the parking lot& watch her crash
or 3. Hey look! Free camper! Help me hook it up to the car!
I was in tears when the Captain pulled in, apologizing in between deep breaths. Did I mention WE were to attend a wedding reception back home and were already 3 hours late? He was frustrated but ever so patient seeing how upset I was over the whole mess.I white knuckled the entire way home following close behind as he drove the truck towing the camper. Every tiny sway had visions of disaster popping in my head the entire hour. I did not feel relief until we were 15 minutes from home.
The next morning I inspected her more closely and found an invasion of ants. One thing led to another trying to find the nest for eradication & well.... she now looks like this after finding the rotten wood of their enjoyment:

We still have some pieces to remove as well as replace. I truly do not mind gutting her down to the floor and bones. It will ensure a much stronger restoration as well as giving the pleasure of rearranging for an ideal layout.
Oh my, what plans The Captain & I have been discussing! I even have Little brother Army involved {and his sweet offer of lending me his air gun nailer setup!}. So I have duct taped my rose colored glasses on should any doubts start creeping in as they had that first day. I can do this! WE can do this! With a little help from a connection of Panda's friends father whom is an electrician as well as The Captains friend who does Carpentry work,  It will be done right from the beginning. Plus, I'll learn some new skills along the way. What? Did you actually think I would just hire someone to do it and not be involved? I'll be there every step of the way. Even if it means just handing them wire cutters & connectors or lugging wood to the band saw.
A grand Adventure has begun.
 
Up next,  Garden update!

Rosy dreams,
~Tammie

Continue..

Filed Under: , , , , ,


Years ago, I came within hours of buying a Vintage Tin Can camper but those dreams were dashed. With things slowing down on the to do list around here, those dreams crept back in for the enjoyable remodeling project.
I think I found her! My Betty! A 1967 FAN Coach Camper that needs SOME work but not a huge overhaul. This dreamy Vintage camper was bought by the current owners as a restoration project a few years ago but their jobs kept them from going beyond the cleaning as well as the start of repairing the once leaked upon roof interior. I ventured out this weekend with Little man at my side, to look the 13 foot long camper over.
I fell.. HARD. I did not expect to have the first one I look at to have such an impact. She met every one of the bits on my checklist and I made my offer after discussing it with The Captain. I find out today if this will be my "Betty".

You can see where they began to remove the water damaged ceiling wood as you peer through the door.

 She even has a tiny Latrine! Not sure if that will be removed or remodeled until I get in there.
See the original stove in ugly brown? Rust Oleum has refinishing product for that.
Standing in the doorway, you see the back seating/ twin bed area as well as the Kitchen side. The seating has a wood pull out system which would fit a Twin size mattress perfectly. The electric fireplace is obviously not original but would be added in the remodel plans. Fall Camping would be much nicer with a heating unit.
The current owners have already sanded down all the wood {BONUS!} for stain & sealing. This dining area transforms into a Full size bed nook. That stick on squares of tile MUST go.
Get a look at that most likely never used oven!

I will be crushed if this one slips through my hands but in defense of the possibility, I was not prepared to buy this soon. I wanted to look over as many as possible to educate myself in differences, what to look for, etc. I got lucky with this couple. A project they meant to undertake no longer fit their schedule and they want it to go to someone who wants it for restoration remodel to USE. NOT resell for a profit being they were selling it so low in price. The wife has voiced it to her husband whom told me, his wife prefers I get it since all the other interested parties are looking for a resell venture.
Now if only that would play in my favor of our negotiations...
Hopefully, I share next the excitement of bringing "Betty" home but if not.... the hunt will continue.
As for the current undertakings,
Black Raspberries are being picked every morning, producing almost 3/4 a colander each time. PLENTY more on those canes but one of my larger spots has been invaded by black angry hornets. Grr.
Frog & I hit some trails around the lake for Blackberry reference and could not pass up some picking of the areas black raspberries. Upon which we found this nestled within the heart of a patch just 3 1/2 feet off the ground:

I have neglected you so this warmer season and will try to be more of a presence. Especially if I get my "Betty". yep. Vintage Camper remodel fun. Maybe I can get her ready for a trip to the Country Living Fair this September with Panda at my side. That place is surely to produce some Tin Can fancy decor.
Sweetest dreams,
~Tammie

Continue..

Filed Under: , , , , ,

AD

Related Posts Plugin for WordPress, Blogger...